Thursday 28 February 2013

Gooey Chocolate Brownies

So I think it's clear by now, that I should be a lot heavier, and flabbier than I am. My sweet tooth is unstoppable, and my will power practically non-existent, as is proved by yesterday evenings activity of eating Nutella straight out of the jar.
(This was a little lesson learnt from  my cousin Georgie. At just age 15, the girl is a genius).

But here it is - another baking recipe.

This time, Brownies. Yummy, scrummy, couldn't be worse for you, gooey in the middle chocolate brownies.

I baked this batch as a request from Laurie's housemates. They've all just moved into this lovely London flat, and have been kind enough to let me stay and shower. I fully intend to be there quite a lot and so told them I'd bring baked goodies by way of rent. They seemed happy with this arrangement, and this time, requested brownies.

I didn't get a chance to take any photos of them (foolish - I know. I can only apologise.). You'll have to take my word for it when I say that they looked like this, but without the nuts:


You can add as many bells and whistles as you like to these brownies, but in this instance I didn't as I didn't know if Lewis or Dan had nut allergies, and we all know that fruit in desserts is a controversial topic.
I was a bit worried it would make them a bit hefty, but it didn't. Win.

What you need:
250g Unsalted Butter
200g Dark Chocolate
80g Cocoa Powder
65g Plain Flour
1 tsp Baking Powder
360g Caster Sugar
4 large egss

I did warn you it was an unhealthy one....

Right, and now the method:
1. Pop on your oven to pre-heat to 180oC/Gas Mark 4
2. Line a baking tin with greaseproof paper. I spent ages trying to get all the crinkles out, and I'm really not sure its possible, so learn from my error and don't stress over it!
3. Melt the butter and the chocolate in a bowl over simmering water. If you want to add cherries/raisins/nuts etc - now is the time to committ.
4. Mix together all the dry ingredients, and then add the chocolatey, buttery goo. Mix together well.
5. Beat the eggs together, and then add into the rest of the mixture. Stir together until all nicely blended.
6. It should be really liquidy still, so pour straight into the baking tray and flatten it out so all corners are covered and its nice and level.
7. Pop them in the middle of the oven for 25 minutes. You can check they're cooked by popping a skewer in the centre of the brownie. Unlike a cake, you don't want it to come out clean. Goo is good!
8. Let them cool in the baking tray, and then lift them out on the baking paper. Cut them into individual squares (or rectangles, if you're feeling crazy), and your yummy gooey brownies are ready to be munched. Delish.

Friday 15 February 2013

Chocolate Crinkle Cookies

I don't know about you, but I love a good bake and although I won't pretend to be fantastic at it, or anywhere near entering 'The Great British Bake Off' there's nothing more calming and therapeutic than spending a quiet Sunday afternoon whipping up a batch of brownies, or in this case, cookies, in my opinion.
Plus, I'm a firm believer that there's nothing more impressive than a girl who can bake, and do DIY. I may not be queen of putting up shelves, but it turns out I can make a pretty decet bath of cookies, and that makes me Wife Material. Yes. I said it.

So here's a little creation to tempt any potential suitors out there. Chocolate Crinkle Cookies!

What you need:
175g Plain chocolate, chopped
4 tbsp unsalted butter
175g plain flour
½ tsp baking powder
½ tsp salt
2 medium eggs, at room temperature
150g caster sugar
1 tsp vanilla extract
60g icing sugar

The method for these is simple, and also gives lots of excuese to 'clean' the mixing bowl. Instantly a brilliant recipe!

First, melt the chocolate and butter over a saucepan of simmering water (Bowl licking opportunity #1)
While melting and then letting it cool for a little bit, mix together the flour, baking powder, and salt.

Next, beat the eggs and sugar with an electric whisk for 2 mins, until they turn pale. Then lower the speed, and pour in the chocolate mix, and add the vanilla extract. Finally, add the ready-mixed dry ingredients until all nicely mixed together.
I was a bit worried at first that it was so liquid-y, but do not fear. Have faith in your baking skills, cover the bowl in cling film, and pop it in the fridge for an hour and a half.

Come back to it once its all nicely set and cooled, and pre-heat the oven to 160oC.
Line a baking sheet with baking paper, and pour the 60g icing suger into a bowl.

Scoop out the mixture, and roll it in your hands into balls that are approx. 4cm in diameter. Roll the ball in the icing sugar, and pop onto the baking sheet. Then gently press down until flat, but make sure they're still quite thick. Mine were about 1cm in depth.  (Bowl licking opportunity #2)

Once you've done this, pop them in the oven.
Now, the danger is in overcooking them. For me, one batch came out beautiful, and the second came out a little bit overdone, with about a minute difference in time. The recipe says 12-15 minutes, and I've now worked out that mine take 13 minutes exactly.
The great thing about cookies though, is that unlike cakes, there's no problem in opening the oven door to check on them, so keep checking!

Et voila!
I was pretty impressed with them - they're certainly the most successful cookies I've ever made.
If you feel inspired to try them - let me know how it goes! Or if you have any other baking recipes that you think I need to try then get in touch!

Friday 8 February 2013

Rimmel - Apocalips in 'Luna'

 Apologies for another lip product post, but I couldn't resist!
I popped into Boots on my way home last week. Forty minutes, and half my pay cheque later, I emerged with a bag full of goodies.
You know when all your make-up runs out at once? That happened. And I couldn't go in and only buy the staples, there were too many other things I wanted to try!

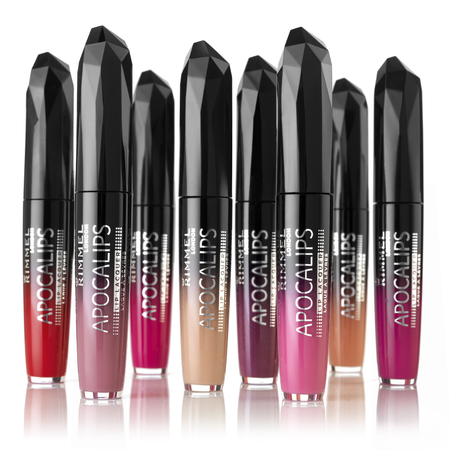
My favourite purchase of the lot, was this lip lacquer, by Rimmel. The 'Apocalips' range comes in eight different shades, and it took me a long time to choose just one.

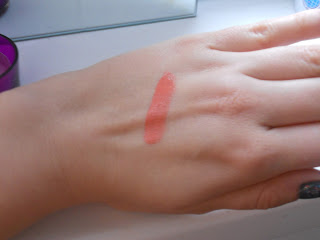
 I normally go for a darker shade, but in the spirit of trying something new, I picked up 'Luna', which looks like this:


Normally, lighter, coral shades don't really suit me, but the pigmentation of the lacquer meant it was so bright that it worked, even with my skin tone. It really did make for a great casual everyday gloss.


The other thing I noticed is that the doe foot wand has a teeny tiny cup shape that fills with the product, so you don't have to keep dipping in and out of the tube to apply. One dip, and you can apply it to your whole lips. I don't know about everyone else, but as someone who regularly oversleeps and has to apply their make-up on public transport, I think this is somewhat revolutionary. (Yes, I went that far!)

I'll definitely be back to buy more of these, but that means more decisions...what colours have you tried, and would recommend?

Friday 1 February 2013

January 2013

I honestly cannot believe a month of 2013 has passed already! Crazy crazy times. And what a busy month its been!

I've been working a lot, and at some very strange hours, but this doesn't mean I haven't made time to have some fun too. After Christmas, I headed back to my new little home (albeit, very temporary) in Cardiff. But throughout all of January this weekend coming will be the first that I've spent here!

I had some annual leave to take, and so spent a luxurious 4 day weekend in London with the boyfriend, who also managed to get the same days off - nothing short of a miracle! We spent an amazing day doing lots of London touristy things (Which is definitely acceptable again since I gave up my flat there). First stop was Battersea Cats and Dogs home, which was beautiful - such adorable doggles! I feel in love with one kitten too many though, and had to be consoled with a Cadbury Creme Egg when we left.

Next stop, was The Barbican for a visit to the Rain Room.
I realise that this sounds like a relatively middle-aged thing to do, but it was incredible, and I'd recommend a visit to anyone. It was quite a long queue, and at times I did question if it was going to be worth it, but armed with a Costa, the queue went quickly, and I'm so glad we waited.


The rain room is what it says on the tin - it rains indoors, but little sensors on the wall mean that it will stop raining whereever you are and you stay perfectly dry. At least, I stayed perfectly dry. Laurie got a bit too over-excited and moved to fast for the installation and consequently got a bit of a soaking.
Have any of you been? What did you make of it? Would love to see any photos you managed to take!


We dried off, had some dinner, and went for a cocktail or two at B@1 Spitalfields with some friends. We danced, we laughed, we were served copious amounts of cocktails and shots, and we planned our entry into the Red Bull SoapBox Race later this year. Yep. That's definitely going to happen.


 Oh, and to top off our weekend, we made the most of the snow, and built a Snow Boy (He was too little to be a snowman) His name is Morris.


 The following weekend was a trip home to celebrate my best friend Chloe's birthday. As with every single one of Chloe's parties, it was fancy dress on a budget. All in all, an amazing night. best explained in pictures...

The theme was 'Lets be Kids Again' - so you had to come as your favourite kids character. or just dressed as you would have to a birthday party when you were 5!
Admittedly, Wonder Woman wasn't my favourite children's character. But I did like super heroes. and this was the best I could do without spending any money on a costume!


Complete with Birthday cake (made by the wonderful Sophie Davis!), pinata and party bags it was perfect!


This weekend is my first weekend in Cardiff of 2013 and there's already lots planned. The Six Nations starts tomorrow, and you can't help but be a bit of a rugby fan when you live here. The atmosphere is amazing, so I'm heading out on the tiles for drinks with the girls. Can't wait!
If anyones out in Cardiff this weekend - give me a shout, and I'll buy you a shot!